Live Broadcasting with the Vonage Video API
The Vonage Video API allows you to create just about any video experience you want. One common use case that developers have is the need for situations where one, or few, people are broadcasting out to a larger audience who is only listening, like attendees watching a live stream of a conference.
In this tutorial
The Vonage Video API lets you quickly put together a room to allow a single person to broadcast, and others to join and watch. We will go over how to get a demo up and running with our existing demos so that you do not have to write any code, but we will also explain what the code is doing in the background.
- See the Demo - Check out the demo without writing any code
- How the Demo Works - The Client Side - What the Client Side code is doing
- How the Demo Works - The Server Side - What the Server Side code is doing
Prerequisites
To complete the tutorial, you need:
- A Vonage account - for your API key and secret
See the Demo
If you want to check out the demo before we write any code, we have a sample web server and JavaScript code to try out what a basic video call looks like. All of the code is open source and publicly available, so you can try out the demo and then use the code to make your own modifications.
Launch the Node.js Server
The video demo requires a backend server to handle things like creating client tokens for authorization and general session management. While you can build this in any language you want, we have a pre-built server you can use to get started over at the Vonage Video Learning Server (Node.js) on Code Hub. From the Developer Documentation, click on "Code Hub" in the top navigation bar, and then scroll down and find the card for "Vonage Video Learning Server (Node.js)." Click on it to open it up.
You will get a description of what this project does. For now, let's click on "Get code" so that we can load it into the Code Hub online editor. Click on "Create a new development environment." Name the workspace "Vonage Video Demo" as we can use this backend for multiple demos. This demo does require a number to be assigned to it, as the learning server supports telephone calls via SIP. While we will not use that in this demo, go ahead and click "Assign a number" to assign an existing number you have from Vonage, or purchase a new one to use with later demos.

Code Hub will create an application automatically for you, including setting up the public and private keys that our application will use. Once the workspace is created, you will be dropped into the code editor, which is an online version of Visual Studio Code. Feel free to follow along with later parts of this demo to view the code, and you can edit this code as needed for your own projects.

To run the application, click on "View" at the top of the editor, and then "Terminal." This will open a command line in which we can run commands. All we need to do is type vcr deploy and the code will be deployed. This will take a few moments as it packages up the code and executes it on the Vonage Code Hub servers. We will want to make note of the "instance host address" that it outputs near the end.
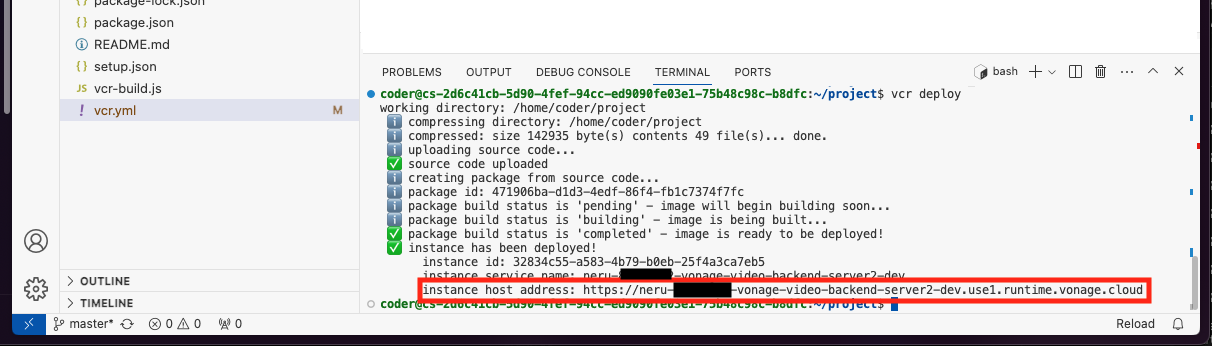
If everything is working properly, you should be able to visit the "instance host address" and be greeted with the following page:
Test the Front End
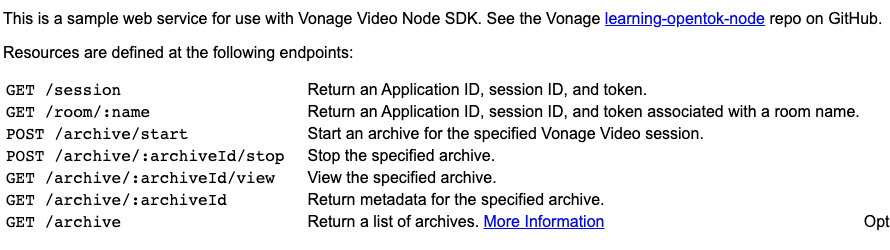
The backend server works directly with all of our pre-built demos, including this one-on-one demo. Head on over to https://github.com/Vonage-Community/video-api-web-samples/tree/main/Live-Broadcast, which is the source code for the front-end part of this demo. This sample allows two users with the URL to join the demo.
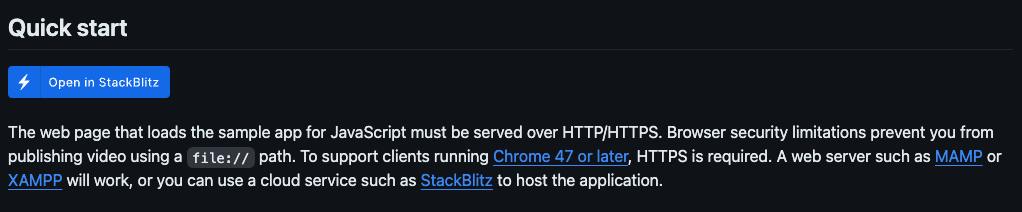
The easiest way to run this demo is to click on the "Open in Stackblitz" button in the README.
This will open the project in Stackblitz. As with the backend server, you can browse the code and modify it here if you would like. For this demo, all we will need to do is open the js/config.js file and plug in the Code Hub instance URL in the SAMPLE_SERVER_BASE_URL variable:
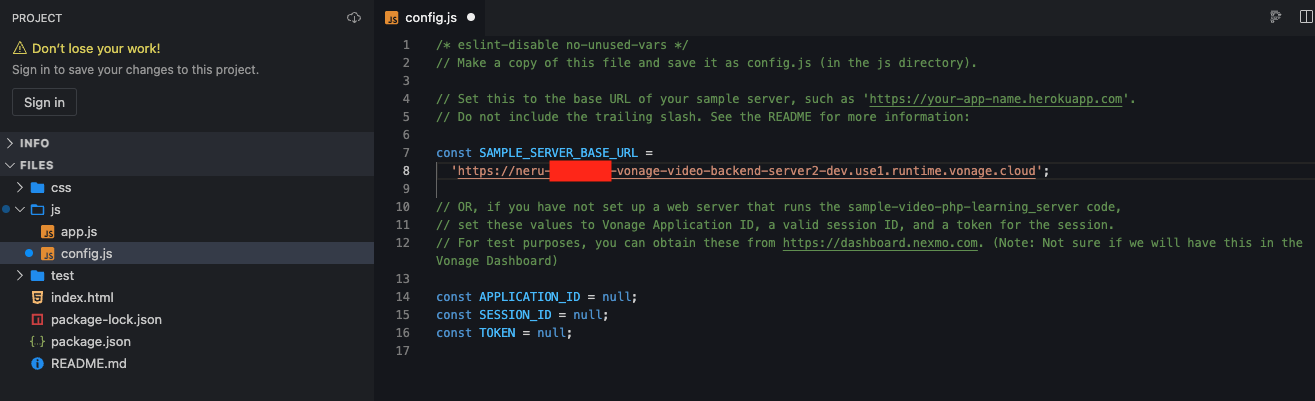
Once you save the file, you can refresh the demo view on the right-hand side of Stackblitz. This sample is broken into a few pieces which include a host view, and two different ways to view the video itself. We will focus on the non-RTMP broadcasting.
How the Demo Works
Configure a Vonage Application
For our video application to work, we need a way for our client and server to talk to the Vonage servers. Code Hub configures this for us, but if you are running the code locally or want to know what that entails a Video app is configured just like another other API. We need to set up a Vonage Application to house all of the configuration for our application, as well as help generate the necessary items for us to do authentication.
Head on over to your Vonage Customer Dashboard and log in. Once you are logged in:
- Click on "Applications" under "Build & Manage."
- Click on "Create a new application."
- Give the application a name, like "Basic Video Demo."
- Click on "Generate public and private key", which will have you download a file named
private.key. Keep track of this file for later. - Scroll down and toggle on "Video". We will leave these values empty for now.
- Click on "Generate new application" to create the application.
Once the application is created, note the Application ID. If you are running the code locally we will need this to configure the backend. If you are using Code Hub, the server code already has access to the Application ID and Private Key.
The Client Side
The client-side portion of the demo consists of two different parts - some HTML elements to put the video feeds in, and then some JavaScript to fetch login information and talk to the Vonage Video servers.
Since this is a browser demo, we use the JavaScript SDK located at https://unpkg.com/@vonage/client-sdk-video@latest/dist/js/opentok.js, and include that in a script tag in our HTML in index.html.
The Host
For the host view, we really only need to view the camera of the host, as well as some UI to control different options like starting the broadcast, enabling low latency, and status updates. For viewing your own camera, we make a <div> element to host the video element:
// host.html
<div>
    <h2 class="font-black text-2xl">Your Camera</h2>
    <div class="h-80 w-80" id="host"></div>
</div>
The rest of the Host page are buttons and config for the live broadcast itself. We will leave all of the options alone, and worry about the Broadcast Controls. These are just some simple buttons we will wire up to call the server application to start and stop the broadcast feeds.
// host.html
<div><h2 class="font-black text-2xl">Broadcast Controls</h2></div>

<div>
    <button x-show="broadcastStatus == 'stopped'" x-on:click="broadcastStatus = 'started'" id="btn-start" class="bg-blue-500 bold text-white p-4 rounded">Start Broadcast</button>
    <button x-show="broadcastStatus == 'started'" x-on:click="broadcastStatus = 'stopped'"  id="btn-end" class="bg-red-500 bold text-white p-4 rounded">Stop Broadcast</button>
</div>
Our connection in JavaScript is minimal compared to other setups where multiple people will be engaging together. Normally we would connect to the session and then immediately publish our video and audio streams, but since we are controlling when a broadcast starts and stops, we will do this in two stages. First, we connect to the session like normal:
// js/host.js

document.addEventListener('DOMContentLoaded', async () => {
    const credentials = await getCredentials('host');
    const session = OT.initSession(
        credentials.applicationId,
        credentials.sessionId,
        {
            connectEventsSuppressed: true
        }
    );

    session.connect(credentials.token, (error) => {
        if (error) {
            console.error(error);
            return;
        }

        let publisher = initPublisher();
        // ...
Once we have connected to the stream, we add an event listener on the btn-start button so that we actually publish and start the stream when the user pushes that button. Starting (and ending) the broadcast is handled by the server-side SDKs, so we make a request to our backend server to start the broadcast.
// js/host.js

document.getElementById('btn-start').addEventListener('click', async (el, event) => {
    const rtmp = [];
    if (document.getElementById('rtmpAddress').value) {
        rtmp.push({
            serverUrl: document.getElementById('rtmpAddress').value,
            streamName: document.getElementById('rtmpKey').value,
        });
    }
    broadcast = await fetch(`${SAMPLE_SERVER_BASE_URL}/broadcast/session/start`, {
        method: "POST",
        body: JSON.stringify({
            rtmp,
            lowLatency: document.getElementById('lowLatency').checked,
            dvr: document.getElementById('dvr').checked,
            sessionId: session.id,
            streamMode: "auto"
        }),
        headers: {
            "Content-type": "application/json"
        }
    })
        .then(res => {
            // Once the broadcast starts we finally publish the host
            session.publish(publisher);
            shouldCheckBroadcast = true;
            setTimeout(checkBroadcast, 5000);
            return res.json()
        })
        .catch(error => console.error(error));
});
At this point, our host is now publishing through the broadcast itself, as well as anyone else that connects. The demo we have does support guests, so as guests are invited to the meetings their streams are automatically added to the broadcast by the Vonage Video API.
Stopping the broadcast is done by the server application, so a quick call to that route on our backend server will stop the broadcast itself. We attach an event listener to the btn-stop button to fire off when clicked.
// js/host.js

document.getElementById('btn-end').addEventListener('click', async (el, event) => {
    broadcast = await fetch(`${SAMPLE_SERVER_BASE_URL}/broadcast/session/stop`, {
        method: "POST",
        body: JSON.stringify({
            sessionId: session.id
        }),
        headers: {
            "Content-type": "application/json"
        }
    })
        .then(res => {
            session.unpublish(publisher);
            shouldCheckBroadcast = false;
            publisher = initPublisher();
            return res.json()
        })
        .catch(error => console.error(error));
});
The Viewer - Stream Broadcasting
For a viewer, we only need to have a place to display the host's video stream. Since viewers will not be publishing their own streams, we will have a lot less front-end code to work on with them. We will make a <div> to hold the Host's stream.
// view.html

<div class="grid grid-cols-1 container mx-auto pt-4">
    <h2 class="font-black text-2xl mx-auto">Host Camera</h2>
    <div class="w-1/2 h-96 mx-auto" id="host"></div>
</div>
Since a viewer never publishes their own streams, our JavaScript simply connects to the stream and just waits for streams to be created by the broadcast:
// js/view.js

const credentials = await getCredentials('viewer');
const session = OT.initSession(
    credentials.applicationId,
    credentials.sessionId,
    {
        connectEventsSuppressed: true
    }
);

session.connect(credentials.token, (error) => {
    if (error) {
        console.log(error);
        return;
    }

    session.on('streamCreated', (event) => {
        session.subscribe(event.stream, 'host', {
            insertMode: 'append',
            width: '100%',
            height: '100%',
        })
    });
});
The Viewer - HLS
Running HLS only takes the addition of a <video> element instead of using a <div>. If you want to use HLS instead, we make a <video> element that we will attach a source to later. Note that you will need additional JavaScript for most browsers, so we will also include the HLS JavaScript library, available on NPM:
// hls.html

<script src="https://cdn.jsdelivr.net/npm/hls.js@1"></script>

<div class="grid grid-cols-1 container mx-auto pt-4">
    <h2 class="font-black text-2xl mx-auto">HLS Stream</h2>
    <div id="host">
        <video class="w-1/2 mx-auto" id="video" autoplay controls></video>
    </div>
</div>
Our demo has the user get a URL from the host which will contain the broadcast URL as a query parameter. We will use that to attach that stream to the video player. We will also do some basic checks to make sure HLS is supported, as not all browsers support HLS out of the box.
const video = document.getElementById('video');
const videoSource = new URLSearchParams(window.location.search).get('url');

if (!videoSource) {
    alert('No HLS URL was passed. No video will be displayed');
    return;
}

if (Hls.isSupported()) {
    const hls = new Hls();
    hls.on(Hls.Events.MEDIA_ATTACHED, () => {
        video.muted = true;
        video.play();
    });

    hls.loadSource(videoSource);
    hls.attachMedia(video);
} else if (video.canPlayType('application/vnd.apple.mpegurl')) {
    video.src = videoSource;
} else {
    alert('Browser does not seem to have HLS capabilities. No video will be displayed');
    return;
}
});
The Server Side
The server-side portion of any Vonage Video application is used to handle session creation, authentication token generation, and administrative tasks like starting and stopping archives. For this demo, all we are worried about is creating sessions and tokens so users can join the room. While the API itself is a REST API and can be called however you like, we encourage you to use the Vonage Node SDK which handles all the authentication and HTTP calls for you. You can install it in your own application with:
npm install -s @vonage/server-sdk
The demo code already has it pre-installed. If you are running the code locally, you will need to run:
npm install
to download all the dependencies, and then copy .envcopy to a new file named .env. You will need to fill in the requested information in .env like the Application ID, the Private Key location on disk, and your Vonage API Key and Secret.
The Host
We will give the host a moderator role, so when the front-end asks for credentials we will create the session with the appropriate role. Otherwise, there is almost no difference between the session for a live-broadcast host and a normal video user with the moderator role.
// routes/index.js

router.get('/broadcast/:name/host', async function (req, res) {
  const broadcastName = req.params.name + '-broadcast';
  await createSession(res, broadcastName, { initialLayoutClassList: ['full', 'focus'] }, 'moderator');
});
For more information about creating tokens, check out our One-on-One Video use case which details how sessions can be created.
When the user wants to actually start the broadcast, we use the Server SDK to call the vonage.video.startBroadcast() method, which will turn the streams published into a broadcast session. We then return that data to the client so that it has all the needed information to look up the broadcast and control it later.
// routes/index.js

router.post('/broadcast/:room/start', async (req, res) => {
  const { rtmp, lowLatency, fhd, dvr, sessionId, streamMode } = req.body;
  // Kill any existing broadcasts we have, to be safe
  vonage.video.searchBroadcasts({sessionId})
    .then(list => {
      list.items.map(async (broadcast) => {
        vonage.video.stopBroadcast(broadcast.id)
      })
    })

  vonage.video.startBroadcast(sessionId, {outputs: {rtmp, hls: {lowLatency, dvr}}, streamMode})
    .then(data => {
      broadcastsToSessionIdDictionary[sessionId] = data;
      res.send(data)
    })
    .catch(error => {
      console.error(error);
      res.status(500).send(error)
    })
})
Ending the broadcast is mostly the same - we call the Server SDK's vonage.video.stopBroadcast() method to end the broadcast.
// routes/index.js

router.post('/broadcast/:room/stop', async (req, res) => {
  const { sessionId } = req.body
  if (broadcastsToSessionIdDictionary[sessionId]) {
    vonage.video.stopBroadcast(broadcastsToSessionIdDictionary[sessionId].id)
      .then(data => {
        delete broadcastsToSessionIdDictionary[sessionId]
        res.send(data)
      })
      .catch(err => {
        console.error(err)
        res.status(500).send(err)
      })
  }
})
The Viewer - Stream Broadcasting
In a broadcast situation, all we need to do is give the viewer the appropriate type of connection token. Everything else is handled in-browser by the client-side code.
router.get('/broadcast/:name/viewer', async function (req, res) {
  const broadcastName = req.params.name + '-broadcast';
  await createSession(res, broadcastName, { initialLayoutClassList: ['full', 'focus'] }, 'subscriber');
});
The Viewer - HLS
Viewers watching via HLS do not need any special connection information, as everything is pipped through the video player and broadcast URL. As such, there is no need for server-side code to generate any tokens. If you want to restrict viewers from viewing a broadcast, you will need to build that into your application.
Conclusion
In this tutorial, you saw what goes into the backend server for both stream-based and HLS-based broadcasting, how to create a web client for users to watch broadcasts, as well as a peek at how easy it is to use the Vonage Code Hub and Stack Blitz to quickly test out samples.